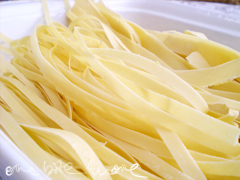
 I've been getting back to basics. Going for walks. Ignoring the computer on weekends. Not shopping (much). Oh, and making pasta. I find it relaxes me - something about the mixing and then the kneading and the rolling and cutting. Making ugly, knotted, doughy things beautiful and smooth and speckled with flecks of sunshine yellow. Watching ribbons of gluten stretched goodness flapping around in the breeze on the balcony. Standing in the kitchen, arms aching, entirely satisfied, without having to trot over to the gym and then back again. Oh. And being about to eat your bicep workout later? Just fantastic.
Mister Fish (sourced with great panache from the Eveleigh Markets) needed a friend to accompany him to dinner. He, with his rich smokiness. She, with her citrussy warmth. They were quite the match. It was, however, a pity that nobody told them that they were to be dinner, rather than guests at the same. A pity for them, I should say. For we were quite, quite happy with the result.

can you see the speckles of yellow?
Pasta making is not hard if you have a machine to do your rolling for you. It is a little more of a workout if you don't, but not entirely impossible. You will be most (most!) appreciative later. Not only for the newfound muscle definition, but for the wonderful thing that is fresh pasta. An especially good thing if you've been eating its dried cousin for years and years. I kid you not. It's so good, I've been making a batch every week.
lemon rind pasta
ingredients:
3 eggs (about 60g each)
300g plain flour
1 lemon
method:
0. Before we start, let's take a look at the ingredients. Generally, I use 1 egg per 100g plain flour (you can use Italian Tipo 0 or Tipo 00 for a finer pasta with a higher gluten content, but plain works just fine). This produces a lovely noodley pasta. If you like, you can increase the egg:flour ratio so you've got 3 eggs and 210g flour for a really nice, yellow, eggy pasta. It will be stickier, but it will also be easier to roll out. Aim for about 75g flour per person for a nice big meal.
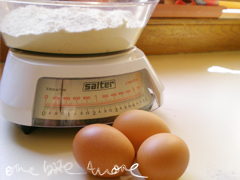
eggs and flour
1. So measure out your flour and pull the eggs out of the fridge. Or out from under the chook. Whichever is more convenient for you.
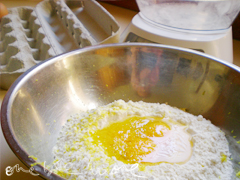
add lemon rind
2. Dump the flour into a bowl (plastic, glass or metal - wood is not so great) and make a dent in the middle that is big enough for your eggs to fit into nicely. Crack the eggs and tip the insides into the floury dent. Grate your lemon rind on top.
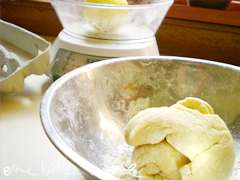
combine to form a ball
3. Now, using a utensil of your choice (I have used a wooden spoon and a spatula with equal amounts of success), smoosh the egg yolks in (tell me that wasn't fun & I'll tell you you're lying) and stir just the egg like you're making an omelette. As you stir the eggs around, the flour will get caught up in it bit by bit. After a while, you'll get to a point where you just can't stir anymore. So scrape off your implement (tell me that didn't sound nasty) and get your hands in there. Stop when you have a ball-ish shape with as much of the flour incorporated into it as possible.
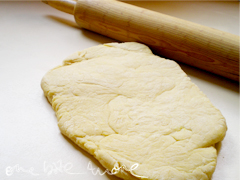
rolling out the pasta
4. Your pasta will need to chill out for a bit. So stick it into the fridge while you wash everything up. All, like, three things you've used since you've started. And that grotty old coffee cup that no-one wants to wash cos it's, well, a grotty old coffee cup.
5. Once your pasta has finished chillaxing, pull it out of the fridge and onto a benchtop. Flour lightly if you will. Roll it out as much as possible using a rolling pin.
6. If you're just using the rolling pin, here's the easiest way to do it.
6a. First, use a higher egg:flour ratio. That will help.
6b. Roll it out as much as you can in one direction.
6c. Stop, let it shrink back a bit, then rotate 45 degrees and roll out as much as you can again.
6d. Lather, rinse, repeat. Which is hairdresser talk for repeat step 6c until you've come full circle.
6e. Flour, flip and repeat again until you've gotten to your desired thickness.
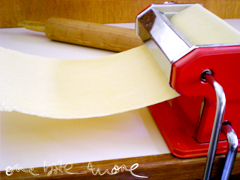
passing the pasta through the machine
7. For those of you who do have a pasta machine, this bit is simple. Lock & load baby. Start with half of your dough. Pass it through the thickest level five to six times, or until the pasta stops looking like a dried out bit of crusty dough and starts looking like pasta.
8. For ease of cutting, fold over any rounded or funny shaped ends so you end up with a rectangular shape.
9. Keep working your way down the roller sizes until you get to about 4 (or whatever half way is for you). Then cut in half and keep rolling. It will get ridiculously long otherwise.

pasta prepped for cutting
10. You should, by now, have four long pieces of dough, all beautifully rolled out and rectangular. As so. Lay one piece out and flour liberally.
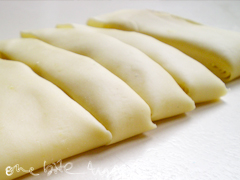
roll it up & cut it up!
11. Roll it up loosely and then cut it into strips of whatever thickness suits your fancy. I like it fancy. I mean, thick. Then quickly unroll the pasta strips! "Yeah! Success!" is what I normally exclaim at this point.
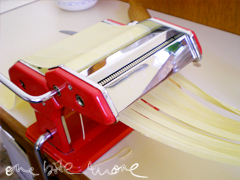
cutting with the machine
12. If you are cutting with the machine, you will get skinner bits of pasta, and your ability to roll in rectangles will become quite (quite) important. Pass it through gently, making sure to line it up properly at the top.
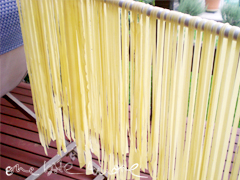
hung out to dry
13. Most importantly? Hang your babies out to dry. I like to make my pasta twice as long as I intend to eat it so that after it is dry, I can snap along the hanging line. How to dry it? Well, alls you gots to do is grab a stick (I used the end of a broom - that I'd cleaned first. Clean it first people!) and prop it up between two things of equal height (my deck chairs). As you cut the pasta & unravel it, drape it over the broomstick. See, pretty no? It'll need about half an hour of dry time before cooking.
How to cook it? Well, I just might deal with that in another post. Stay tuned :)
 I've been getting back to basics. Going for walks. Ignoring the computer on weekends. Not shopping (much). Oh, and making pasta. I find it relaxes me - something about the mixing and then the kneading and the rolling and cutting. Making ugly, knotted, doughy things beautiful and smooth and speckled with flecks of sunshine yellow. Watching ribbons of gluten stretched goodness flapping around in the breeze on the balcony. Standing in the kitchen, arms aching, entirely satisfied, without having to trot over to the gym and then back again. Oh. And being about to eat your bicep workout later? Just fantastic.


15 bites more:
man, why don't you join the Daring Bakers challenge??? You will be good for that! You should join!
Labels: back to basics, italian, recipes
wow dats impressive shez
wish i had a pasta machine i'd LOVE to make my own
xx Betty
Labels: back to basics, italian, recipes
Wow, this is a great advertisement for getting a pasta machine. Your pasta is so smooth and beautiful!
Labels: back to basics, italian, recipes
That looks fantastic and very professional! What sauce did you end up serving with it?
Labels: back to basics, italian, recipes
Looks fantastic! Good to see Mister Fish went to a good home! :D
Labels: back to basics, italian, recipes
OOhh nice niiiccee! Yes please do another post with the final marriage of Mistah Fish and Miss Flrp
Labels: back to basics, italian, recipes
Nice work! Almost makes me want to go out and buy a pasta machine to make my own.
Do you know how long you dried fresh pasta lasts for, storage wise?
Labels: back to basics, italian, recipes
Billy: i've been wanting to but i'm so scared! look at all the elements! arrrrgh! but yes. maybe i do.
Betty: it's just as tasty without the pasta maker... go on. you know you want to ;)
Belle: the maker was a birthday present from Miss Shiny. Only rediscovered it recently, and am absolutely loving it!
Lorraine: pasta was joined by Mister Fish & a really simple cream, 2 cheese & chive sauce. squeeze of lemon on the top really brought out the flavours.
Y: if i was a fish, i think this is how i'd want to go. either that or steamed, chinese restaurant wedding reception style.
FFichiban: will do! this week? sure!
Simon: hehe. the red makes it go faster :) and no, not really because i tend to eat it almost straight away. i have kept it in a air tight container for three days before though, and it was fine from that.
Labels: back to basics, italian, recipes
The lemon rind pasta sounds intriguing. Can't wait to see what you make as the sauce.
Labels: back to basics, italian, recipes
I was going to ask about storing it too. Room temperature or fridge? Can you freeze it? I once tried making gluten free pasta with a besan flour. It was ok, and I'd love to make it in bulk and store it.
Labels: back to basics, italian, recipes
Ciao Chow Linda: thanks Linda - all the oil in the lemon zest imparts a lovely light flavour.
Arwen: i fridge it, but that's purely out of habit. also because i get concerned about the eggs. never tried freezing it before. as i said, it tends to disappear fairly quickly around my place :)
Labels: back to basics, italian, recipes
Just saying 'lemon rind pasta' makes my mouth water - I can almost taste it! What a wonderful idea and a great tutorial too ;)
Labels: back to basics, italian, recipes
OH MY GOD SHEZ
YOU MAKE YOUR OWN PASTA????
HOWWWWW AWESOMEEEEEEEEEEEEEEEEEEEE!!!
okok i'll stop with the caps!! are you a chef???? have you ever thought of being a cheffff??? i have never ever thought about making pasta.. I always thought it was hard to make.
I love your recipes / photossss they're truely amazinG
Labels: back to basics, italian, recipes
Christie: it seems so innocuous, but oh! the flavour!
smileona: nono! not a chef in the slightest. couldn't deal with the long hours and being on my feet. but thankyou :) glad you're enjoying the posts!
Labels: back to basics, italian, recipes
Lemon Rind Pasta sounds soo lovely, what a great idea!
Labels: back to basics, italian, recipes
Post a Comment