back to basics: "ricotta" cheese
 I was never really a cheese person. I mean, c'mon. I'm Malaysian. Not French. Not Italian. Up until I was in my mid teens, the only cheese I ever knew was the type that came singly wrapped in plastic. And it wobbled when you shook it. (And again, for effect) Wobbled. We would, on occasion have some sort of grated yellow on a lasagn-esque meal. And I'd tried the grated yellow powder on my pasta at the Pizza Hut all-you-can-eat buffet, but found it, well, a little nasty. Oh, and up until a little while ago, lactose played havoc with my body. So no cheese for me.
And then, one otherwise unmemorable day, I had some brie. I think I took it for politeness' sake. "Some brie for you?" "Oh, er, sure. Thanks." And all of a sudden, there was this sweet yet salty, creamy, bitey flavour permeating my unaccustomed tastebuds. "Oh… Hey… Yum!" And so it began.
Now, by all accounts, cheese can be a tricky pain-in-the-behind to make at home. It often involves tricky-to-find ingredients. Like rennet. It can also involve spending long periods of time waiting. And waiting. And waiting. So I've started simple. With a "ricotta". Inverted commas because it isn't really a ricotta, but can be used in lieu of one. Ricotta, you see, is made from the whey (as in curds and whey a la Little Miss Muffet) that is poured off when making other cheeses, like mozzarella. Because it's made from the run-off, the yield for ricotta is fairly low. I am not the type to deal with low yield. So a cheat's version it is! And simple too. Oh, so simple.
I've made two versions. One plain, one beautifully (and tastily) spiced. Recipes used here are adapted from 101 Cookbooks.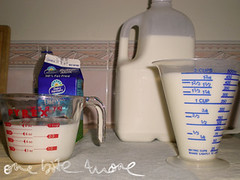
ingredients ready to go
Plain Ol' "Ricotta" Cheese
Yield: approximately 230 grams
Ingredients:
250ml buttermilk
1 Litre milk
A pinch of salt
Equipment:
Non-reactive pot
Sieve
Tea towel or handkerchief
String
Normal ladle
Ladle with holes in it (I used a hot pot ladle)
Thermometer
Bowl
Method:
1. First things first. Make sure you have everything that you'll need. This will save you much panic later when you are running around your kitchen, dripping teatowel in hand, yelling "String! I need some string!" and causing yourself to grey prematurely.
2. Got it all? Good. Now tip your milk, buttermilk and just a pinch of salt into your pot and heat gently. Stick your finger in and taste it. This is how your cheese will taste. So if you like a saltier ricotta, add a touch more.
all the ingredients in the pot
4. Check the temperature. Still nothing? That's ok. Because when it hits 65C, you'll suddenly notice that your liquid is thinner and lumpier than before. Keep stirring though. That's right. Stir Stir STIR!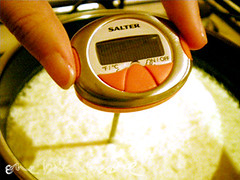
65C: starting to come together
6. Here's where you set up your straining device. Place a sieve over a bowl. Now line said sieve with a tea towel or men's hanky. Why the gender discrimination? Men's hankies are bigger. Ok? Ok.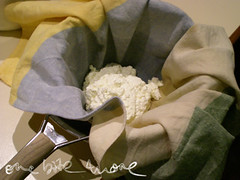
my trusty straining device
scooping the curds out
my super techy dripping device
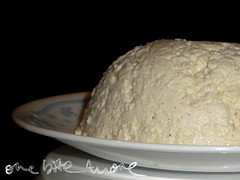
10. Drain the cheese for about 10 minutes, or until the tea towel stops dripping profusely. When you open it up, you'll see a mass of cheese inside. Hoorah! Carefully group it together with your hands and place it in a container to cool. As an optional extra, use a teacup to mould your cheese into a nice little shape before packing it up. Just try not to push down too much, as this will squeeze the moisture out of the cheese and make it hard.
11. Voila! You now have a lovely curdy cheese for eating with pears on toast. Or, for using in one of a number of recipes, some of which will be posted here, and soon!
cheese and pears - yummo!
All you need to do is add ¼ tsp mixed spice and the zest of a lemon in with your milks in step 2. This version is lovely and fragrant, without being sweet.
Recipes using this mixture include one times deliciously moist cake. Coming soon.
12 bites more:
i'm impressed shez! (i almost put chez, i have a friend named chez hehe)
i've had ricotta a few times- only on some hospital vegetable lasagne. .. it was nice!
xx Bets
Labels: back to basics, recipes
Looks delicious! I don't cook with ricotta much, but actually quite like baked ricotta.
I haven't eaten plastic wrapped singles in awhile, but they'll always hold a special place in my heart, because I loved them as a kid. That, and laughing cow cheese!
Labels: back to basics, recipes
Bravo! I am so impressed you made your own cheese! I've sometime contemplated it but then thought "Oh no, too hard" but it looks quite straightforward thanks to your action shots.
Labels: back to basics, recipes
Hey! Great start to your back to basic series. This looks oh-so-easy to do for those time when I want to make ricotta filling during the wee hours of the morning and I have a reasonable surplus of milk.
Ok, bad example, but I'm sure I can find a use for such an easy preparation :)
Labels: back to basics, recipes
Hee hee ladle-with-holes-in-it hee hee and are you saying men are snottier than women so they have bigger hankies 0_o?
YAYY!! for chheessee though and you make it look/sound so easy!
Labels: back to basics, recipes
Hi there! Reading this post was like reading the cheese story of my life - the Malaysian lactose intolerance, kraft singles, Pizza Hut and then the brie realisation, wow. Now to make some of this cheese and make hotcakes with it! Really great post :)
Labels: back to basics, recipes
Bets: on hospital food? go go go get some real stuff & try it with pears. you'll love it :)
Y: laughing cow cheese! definitely brings the memories back. and i didn't use it much either, until those pancakes took over my life that is...
Lorraine: i had similar feelings. it's not hard at all - and it's even easier the second time around, so give it a couple of shots.
Simon: not as odd as you think. we somehow ended up with 6L of milk in the fridge after a miscommunication last weekend and actually had something to do with it for a change. hmmm yes!
FFichiban: no. just that men have bigger noses. and bigger pockets for putting hankiees in :)
Steph: thanks so much! good luck with the cheese making!
Labels: back to basics, recipes
Wow - great recipe
Thanks for sharing, I'm very impressed at how you made it. How long will it last in the fridge (if for some crazy reason it doesn't all get eaten :) ?
Looking forward to your recipes using this "ricotta"
Labels: back to basics, recipes
This is great! You've made it look so beautifully simple, and even found something to hang the draining cheese from (I've been thinking about this retort stand issue!). I'll have to give this a go.
Labels: back to basics, recipes
Anita: I've kept it in the fridge for up to a week, but it starts drying out and isn't very good by itself at that stage. probably best to eat it within three days? you can continue to use it for baking though...
Arwen: thankyou! the other option i've seen is hanging it from the racks in the fridge (but who has enough space to do that?)
Labels: back to basics, recipes
wow top stuff, making your own cheese. I love that dripping device, reminds me of the DIY version my mum uses for making home made soy bean milk!
Labels: back to basics, recipes
Howard: home made soy bean milk? sounds brilliant! must do a search to see how to do that...
Labels: back to basics, recipes
Post a Comment